Elixir: hands-on course

This will be the first in a series of posts on how to set up a production-grade Kubernetes (k8s) cluster on AWS EKS. The series aims to be a piecing together of dissociated documentation and best practices, with a few touch-ups of my own. The end goal is a distilled, yet hopefully comprehensive guide of going from zero to having a service running on k8s.not_a_hello_world_app
I’ll be using macOS 10.15 and
awsCLI v2 throughout the series.
Part 0 - start off on the right foot
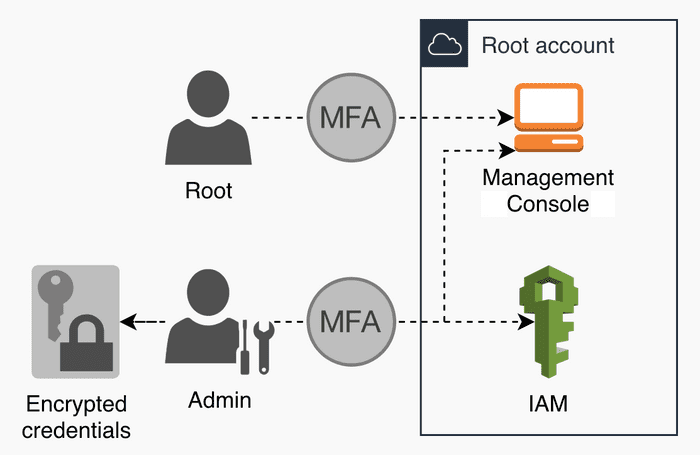
Every part in the series will start with a sketch of its end goal. Where appropriate, highlighted sketches will be interleaved as visual guideposts of where we’re at.

If you don’t already have one, sign up for an AWS account. This will be our ‘root’ account, from which we’ll later set up other, child accounts. The ‘root’ account will only house the root user and an admin IAM user.
Root user
Sign in as the root user, with email credentials you provided at signup, and make sure that:
- A multi-factor authentication (MFA) is enabled. Even using a virtual MFA device will be a vast improvement.
- The root user doesn’t have access keys set up.

From now on, the root user should only be used in exceptional cases.
Admin IAM user
Still logged in as the root user, go to the AWS IAM service. There, click on “Groups” and then “Create New Group”. Give it a name, such as “Admins”, and attach it a policy of AdministratorAccess. With the admin-group created, click on “Users” and then “Add user”. Give it a usernameusername, both access types (programmatic and Management Console), and add the user to the created “Admins” group. Skip tags, review, and click “Create user”. You now have your first IAM user set up.
Right after a successful user creation, you’ll be shown its “Access key ID” and a “Secret access key”: store both to a temporary location. These two are usually stored in ~/.aws/credentials, in insecure plaintext.
Encrypted credentials
Let’s improve our security stance by encrypting these credentials with your GPG key and a password manager pass.
brew install gnupg # If using macOS.
brew install pass  # If using macOS.
gpg --generate-key # If you don't already have one.
gpg --list-secret-keys # Copy the ID from the output.
pass init {your_GPG_ID_from_previous_output}
pass insert aws/{your_profile_name}  # The same "aws/" path as in `credentials-pass.sh` below.
In ~/.aws/config, add a credential_process line to the IAM user’s [profile].
[profile {your_profile_name}]
credential_process = /Users/{your_username}/.aws/credentials-pass.sh {your_profile_name}region = us-east-1
output = json
cli_history = enabled
Tip: Consider renaming the default
[default]profile in~/.aws/config, if you have one. You’ll thus force yourself to always be explicit about which AWS account you wish to run API calls against. Or, at least don’t have any critical account set under[default]profile.
Tip: Having
cli_history = enabledallows you to then list used AWS commands viaaws history list.
Now we have to write a script that we pointed to via credential_process above. Below is such a script that connects pass with aws CLI and returns a JSON object in the format that aws CLI expects.
#!/bin/bash -Eeu

readonly aws_profile="$1"

arr=()
while read -r line; do
  arr+=("$line")
done <<< "$(pass "aws/$aws_profile")"
# The same "aws/" path as in `pass insert` command above.

readonly accessKeyId="${arr[0]}"
readonly secretAccessKey="${arr[1]}"

jq -n \
  --arg accessKeyId "$accessKeyId" \
  --arg secretAccessKey "$secretAccessKey" \
  '.Version = 1
  | .AccessKeyId = $accessKeyId
  | .SecretAccessKey = $secretAccessKey'
Delete this profile’s credentials from ~/.aws/credentials.
[{your_profile_name}]aws_access_key_id = ...aws_secret_access_key = ...Run a sample command, e.g. aws ec2 describe-instances, to verify that aws CLI now picks up your encrypted credentials via credential_process set above.

Conclusion
You now have a solid foundation to build upon. In the next part we’ll show how to leverage multiple AWS accounts and IAM roles.


